MAKING SIDE-BY-SIDE IMAGES OF NEWSPAPER ARTICLES
©2018 by Donald R. Snow
This page was last updated 2018-09-27. Return to the Utah
Valley Technology and Genealogy Group Home Page or Don's Class
Listings Page .
ABSTRACT: Many newspaper clippings are taller than can be seen on a computer screen, so you have to scroll up and down to read them. This presentation will show a way to separate such tall clippings into shorter pieces and place them side-by-side, so they fit on a computer screen and are easier to read and use. Such clippings can be from scanned hard copy articles or from screenshots of online newspapers, which we will discuss briefly. All the computer programs will be free or very inexpensive. We will also discuss ways to name the files for ease of finding and accessing them. This same process works, or course, for placing any images side-by-side, not just newspaper clippings. The class notes and related information in other articles, all with
active URLs, is posted at
http://uvtagg.org/classes/dons/dons-classes.html
.
WELCOME AND INTRODUCTION TO CLASS
- Instructor is Donald R. Snow ( snowd@math.byu.edu
) of Provo and St. George, Utah.
- These notes, with active Internet links and other related
articles, are posted on my website http://uvtagg.org/classes/dons/dons-classes.html
. Also on my webpage are three Freeware Corner articles that I wrote about this:
Apr 2018 ,
May 2018 ,
and Jun 2018
- Tips: (1) To put an icon on your desktop for the URL
for these notes, or any webpage, just drag the icon in front of the
address in your browser to your desktop. (2) To open a
link from here in another tab, but keep your place in these notes,
hold down the Control key while clicking the link.
- This class will discuss how to make side-by-side images of tall newspaper articles
so they can be used and read more easily on computer screens. We will also
discuss finding such articles onlne and naming the files, so they are findable and usable.
WHY MAKE NEWSPAPER AND MAGAZINE ARTICLES SIDE-BY-SIDE
- Newspaper and magazine articles are usually in columns and may be continued in the next
column or on another page and this makes them difficult to read.
- Digital images of such articles are more readable when the columns are trimmed and placed side-by-side and the text can be enlarged easily by holding down the CTRL key and rolling the mouse wheel.
- Examples in this presentation are articles and letters from my Dad, Eldon Stafford Snow,
some scanned and others from screenshots of online images.
SCANNING THE ARTICLE
- For a hard copy clipping scan the article, so you can work with it on screen.
- I use and recommend FASTSTONE CAPTURE, as discussed in several of my articles.
- Version 5.3 was the last free version and you can find download locations with a Google search.
- Versions after 5.3 are shareware for a one-time fee of about $20 which gives you all future upgrades; available from
http://www.faststone.org/
- I used the free version for several years; then paid the shareware fee so I get all upgrades now; latest version is 9.0
- Program includes the feature of capturing scrolling windows that most other
screen capture programs do not.
- For scanning hard copy newspaper clippings new scanners, particularly those in FHCs, have settings that
give good resolution and help clear up the background and lines
- If the hard copy article is longer than the scanner's flatbed, scan it in two or more overlapping sections,
so you have the entire article.
- For scanned articles, get them as close to vertical on the flatbed as possible, since
that will make trimming them into parts easier later.
- I usually scan newspaper articles at 150 dpi, unless there are pictures, and then I use 300 dpi.
WHERE TO FIND DIGITAL NEWSPAPER ARTICLES
- The U.S. Library of Congress and other national agencies have given grants to universities to digitize all the newspapers in that state and most have started with the
"small town" newspapers since they contain so much local information of family history interest.
- For Utah see https://digitalnewspapers.org/ ; for other states see http://www.linkpendium.com/ and also do Google searches
- There are several commercial websites with the large-city newspapers, e.g.
https://www.newsbank.com/ ; you may be able to use them for free at local public and/or university libraries.
- For the letters written by my Dad that I have found in Utah newspapers on https://digitalnewspapers.org/ , I use their "download pdf" so I have a pdf copy of the entire article exactly as it was in the newspaper;
then I can work with that pdf on my computer and shrink or enlarge it to do the screenshots of the pieces
- More details and additional sources are in other notes on my webpage
NAMING THE FILES FOR EASE OF FINDING
- Here are the names of the files I used below
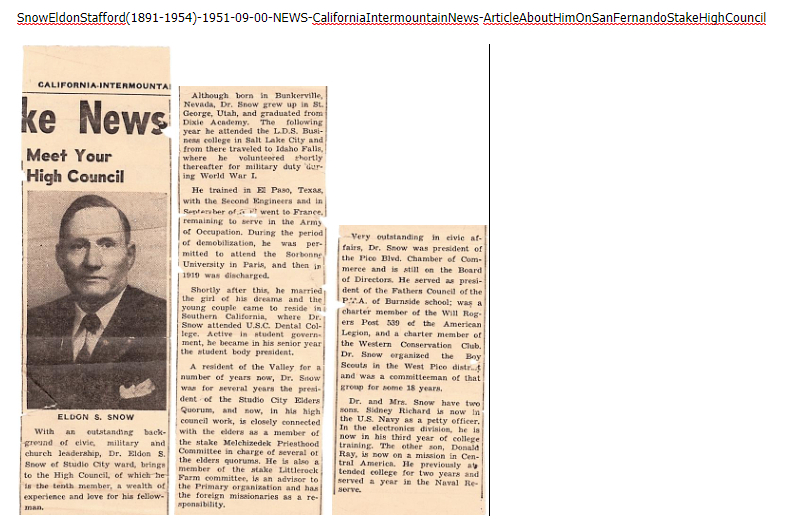
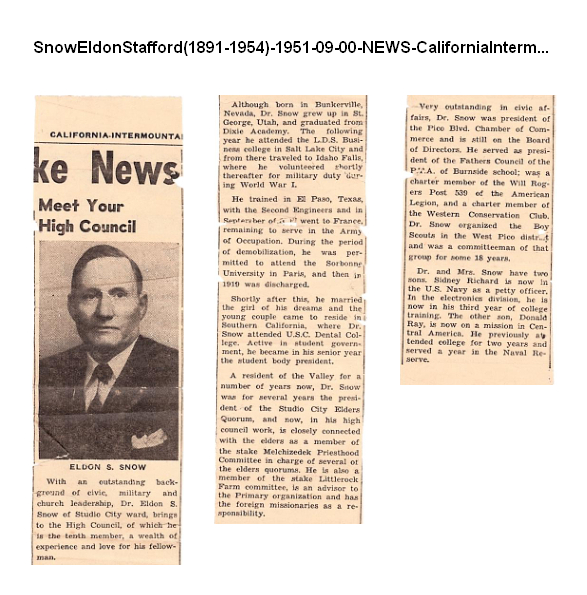
- SnowEldonStafford(1891-1954)-1951-09-00-NEWS-LDS-CaliforniaIntermountainNews-ArticleAboutHimOnSanFernandoStakeHighCouncil
--Scanned-2018-04-04--220308.pdf
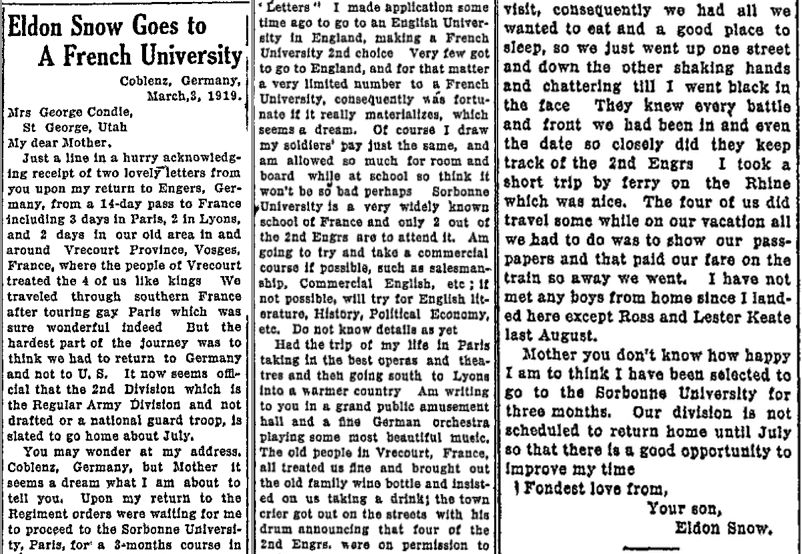
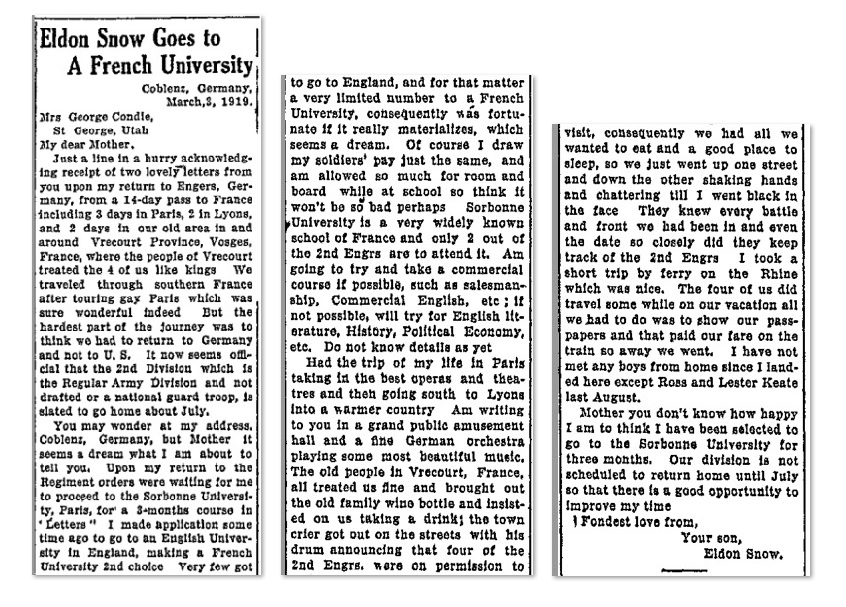
- SnowEldonStafford(1891-1954)-1919-03-03-NEWS-LETTER-MILITARY-SCHOOL-GoesToFrenchUniversityAfterWWI-
WashingtonCountyNews-1919-04-03-FromUtahDigitalNewspapers--e86bb1544eab1cef677858d6b9b78ff838db0ed2--2018-05-08.pdf
- SnowEldonStafford(1891-1954)-1917-12-06-NEWS-LETTER-MILITARY-PapersTakeLongTimeToReachFrance-WashingtonCountyNews-1918-01-03-FromUtahDigitalNewspapers--9aacc84641530585c864aaffeca6c2a2e010807f--2018-06-05.pdf
- The date after my Dad's name is the date he wrote the letter in France and the data later in the title is the date it was published in the newspaper; the dates are written in International Date Format (YYYY-MM-DD) so the file jumps to its chronological
place without me having to put it there.
- See other articles and notes on my website for the reasons and details of this naming pattern.
CUTTING THE ARTICLE INTO PARTS
- Decide what format you want for your final side-by-side image, e.g. jpg, tiff,
png, or pdf, since that may determine the program and format to start with.
- For example, EVERNOTE will work with all the file formats, but it places the separate pieces
side-by-side on the left side of the window and lines up at the bottom; FASTSTONE CAPTURE has a Side-by-Side feature, but will only work with jpg, tif, or pngs, and
not pdfs, and it lines the images up at the top
- To break up a long article into pieces I use FASTSTONE CAPTURE's rectangular clip feature
and save the articles in roughly equal-sized pieces, but paragraph breaks
don't always occur exactly that way and I end up clipping them between printed lines, not necessarily at paragraph breaks
- The pieces can be saved on the clipboard and pasted immediately where you want or you can save them as separate image files; I did both so I could experiment with different programs.
PROGRAMS AND RESULTS
- EVERNOTE -- free and commercial versions available from --
https://evernote.com/
- Takes any image format -- you paste images directly into a note and it lines them up at the left side
and bottom
- This is the simplest program to use.
- Screenshot of my EVERNOTE result.
- FASTSTONE CAPTURE'S "JOIN IMAGES SIDE BY SIDE"
- Join Images Side By Side option is on the Settings menu
- Drag-and-drop the images into the box and set the options the way you want
- Aligns the images at the top - Preview feature allows you to experiment before saving
- FASTSTONECAPTURE also has an image editor, if you want to edit is further
- Screenshot of my FASTSTONE CAPTURE result
- IRFANVIEW TO FORM THE SIDE-BY-SIDE IMAGE
- IRFANVIEW is a free photo editor/viewer available from
https://www.irfanview.com/
- Has a Panorama feature in the Image menu -- click Create Panorama; will take several pictures
and place them side-by-side
- Options include side-by-side or one-above-the-other
- Says you can set pixels between the images, but I couldn't get that to work
- Major problem -- I couldn't find any way to have it keep the original size of each piece,
so they are stretched or shrunk to be the same size and that changes the text size
- Also, it only takes jpgs and not pdfs
- Screenshot of results using IRFANVIEW.
- MICROSOFT'S PAINT.NET TO FORM THE SIDE-BY-SIDE IMAGE
- Free and simple drawing program built into Windows 10 and earlier versions
- Has the capabilities for side-by-side images
- Start by opening a New Image window and making the size of the "canvas"
(the part you "draw" on) about the size you want; this can be changed later
- Show the newspaper file and do screenshots of the parts and paste them
onto the canvas in PAINT.NET; as you paste them they go right on top of each other and you have to drag the top one off to see the previous one
- Once they are side-by-side you can move any piece by clicking on Select > Rectangular Region
(upper left corner) and surrounding it with the dashed lines and then dragging it right or left
or up or down; CTRL-A picks up the entire image on the canvas and moves it, not the individual
parts
- After lining up the pieces, I moved the entire screen and then changed the canvas size
by dragging the lower right corner so it had about the same border all the way around, then saved it with the name I wanted.
- Screenshot of result using PAINT.NET
- This looks OK and wasn't too hard to do; problem is that the text in the first column
looks smaller -- I think I used a different size image when I did the screenshot to put
into PAINT.NET -- That's a problem caused by the nut in front of the keyboard, not the program. :=)
- XNVIEW CLASSIC TO MAKE THE SIDE-BY-SIDE IMAGE
- XNVIEW CLASSIC is a free photo editing program and is already on many of the LDS
FHC computers
- Available from https://www.xnview.com/en/ --
three programs there - XNVIEW CLASSIC, XNVIEW CONVERT, and XNVIEW MP -- all are free for private
or educational use; CONVERT is not what we need here; MP version is a "soupped up" version of
CLASSIC, but the CLASSIC version is all we need here
- XNVIEW CLASSIC only works with files in photo formats, e.g. jpg, tif, png, and not pdf.
- Open XNVIEW CLASSIC and click on the small "tree-like" icon (upper left corner) to show
the hierarchy of folders and files and navigate to where the jpgs are stored
- Highlight the jpgs you want by holding down the CTRL key and clicking each
file; the files in that panel can be shown in various ways, e.g. Thumbnails, List,
or Details; I usually use Details so I can see the title, date created, etc; To change this view click on the small rectangular icon in about the middle of the bar above
the right panel.
- With the files highlighted, click Create > Strip of Images and you get
the Strip menu with the selected files already listed on it.
- Order can be changed by highlighting one and clicking the Move Up or Down arrow.
- Set the other options in this menu, e.g. the Alignment can be Horizontal (side-by-side)
or Vertical (one above the other).
- For the Horizontal option with images side-by-side, you can also select whether you want
them aligned across the top or bottom or each one centered. -- They look good either way,
but my examples here are by aligning them across the bottom
- Uncheck the Automatically Adjust Height or Width, since that will change the image size, and hence the text size
- For the jpgs I used I set the height to be 5 inches --
the height gives the height of the final image and you want it high enough so the whole jpg
is shown.
- The spacing puts a gap between the images with 0 as no gap -- I used the Spacing as 25 pixels
- Select background color and I did one white and one black background to illustrate each
- Click Create to form the image and you see a new tab labeled Panorama which shows the
side-by-side image.
- By clicking on the hierarchy icon (top left) you are back to your highlighted jpg files
and can repeat the process with different settings to generate a new side-by-side image.
- Each result remains and can be viewed by clicking on its tab
- When you are ready to save one, open it and click File > Save As and tell it where to save
it and the name to give it
- Here are the two side-by-side images for this letter, the first with a white background
and the second with a black background.
- Screenshot of result using XNVIEW CLASSIC with WHITE BACKGROUND
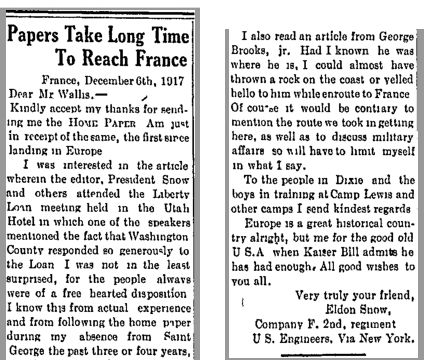
- Screenshot of result using XNVIEW CLASSIC with BLACK BACKGROUND

CONCLUSIONS
- This method helps make articles more readable than long columns; method can also be used to
make a grouping of any images, photos, or articles.
- EVERNOTE is the simplest program to use for this, but may not give what you want
- XNVIEW CLASSIC is free for private or educational use, seems to be simple to use,
and has more features; I have tried the "soupped up" XNVIEW MP, but it may be even better
- There are undoubtedly other free programs to do this.
Return to the Utah Valley
Technology and Genealogy Group Home Page or Don's
Class Listings Page .