DON'S FREEWARE CORNER - JUN 2018
MAKING SIDE-BY-SIDE IMAGES OF NEWSPAPER ARTICLES - PART 3 (XNVIEW)
©2018 Donald R. Snow - Last updated 2018-06-30
Don's Freeware Corner notes are printed in the UTAH VALLEY TECHNOLOGY AND GENEALOGY GROUP (UVTAGG)
Newsletter TAGGology each month and are posted on his Class Notes Page at
http://uvtagg.org/classes/dons/dons-classes.html
where there may be corrections, updates, and additions.
INTRODUCTION
This is the third article in a series about how to make side-by-side digital images of things like long
newspaper articles. In the previous articles we discussed why and how to do this with the programs
EVERNOTE, FASTSTONE CAPTURE, IRFANVIEW, and PAINT. In this article we will discuss using the
free program XNVIEW.
WHERE TO FIND DIGITAL NEWSPAPER ARTICLES
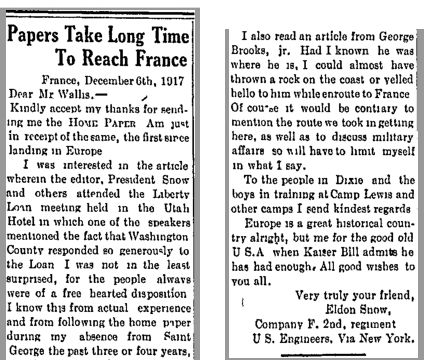
We discussed finding digital newspaper articles on the Internet and this month I've found another letter
from my Dad, Eldon Stafford Snow, that he wrote from France during World War I and that was published
in the newspaper. As I've been searching for these, I discovered that the editor of the Washington County
News of St. George, Utah was sending copies of the paper to all the servicemen in Europe and that my Father was
responding to receiving and reading them. Since the originals of these letters are probably not in
existence now, these are wonderful for me to find. For others of you with ancestors from other locations,
there may be newspapers with letters from your ancestors. The digital newspaper website for Utah
is https://digitalnewspapers.org/ , for Arizona it is http://azmemory.azlibrary.gov/cdm/newspapers ,
and for California it is https://cdnc.ucr.edu/cgi-bin/cdnc . Such sites exist for many states and
you may find lots of information about your ancestors in these. Links to U.S. digitized newspapers are on
the Library of Congress website at https://chroniclingamerica.loc.gov/newspapers/ and an article from
Wikipedia about this is https://en.wikipedia.org/wiki/National_Digital_Newspaper_Program .
The largest U.S. newspaper website is https://www.newsbank.com/ which is a commercial website, but
you may be able to get to it for free through a local public or university library.
SCREENSHOTS OF NEWSPAPER ARTICLES
As I've found these letters of my Dad's online in the Utah Digital Newspapers collection, I've been using
their "download pdf" icon to download them. This gives me a pdf of the full article exactly as it was
scanned and placed on the website. I can open that pdf on my computer and shrink or enlarge it and copy
the parts the way I want. As discussed earlier, I've been using the shareware program FASTSTONE CAPTURE
- http://www.faststone.org/ - for screenshots, since it has so many features I like. Using it, I do
screenshots so the parts of the letter are approximately the same length so, when side-by-side on the screen,
the article will be easier to read. My naming system makes the files and pieces easy to find and
chronological where they belong. Here is the name of the example letter for this month.
SnowEldonStafford(1891-1954)-1917-12-06-NEWS-LETTER-MILITARY-PapersTakeLongTimeToReachFrance-WashingtonCountyNews
-1918-01-03-FromUtahDigitalNewspapers--9aacc84641530585c864aaffeca6c2a2e010807f--2018-06-05.pdf
Dad wrote it on 6 Dec 1917 in France and it was published in the Washington County News on 03 Jan 1918.
The reasons and details of my file naming system are described in other articles on my website. The dates
are written in International Date Format, YYYY-MM-DD, so the file jumps to its chronological place without me
having to put it there. This particular letter can all be read on one screen, but two pieces side-by-side
makes it easier to read or enlarge or copy, etc.
USING XNVIEW CLASSIC TO MAKE THE SIDE-BY-SIDE IMAGE
The freeware program XNVIEW CLASSIC is a photo editing program already on most of the LDS Family History Center
computers and is available from https://www.xnview.com/en/ . There are three versions of XNVIEW,
namely XNVIEW CLASSIC, XNVIEW CONVERT, and XNVIEW MP. The webpage notes that all of them are free for
private or educational use, but you need to buy a license for commercial use. The CONVERT program is a file
converter, not an editor so it doesn't do what this article is about. The MP version is a "supped up" version
of the CLASSIC one, but I haven't found how to do the side-by-side images with it and don't know if it really does
them. So this article discusses the CLASSIC version and I think that's the version on FHC computers.
XNVIEW CLASSIC has many helpful features, but it only works with files in photo formats, e.g. jpg, tif, png, etc.,
and not pdf. So to get the files I needed, I opened my downloaded pdf and used FASTSTONE CAPTURE to make jpg
files of the two parts of the letter. Then I opened XNVIEW CLASSIC and clicked on the small "tree-like" icon
in the upper left corner that shows the hierarchy of folders and files on my computer. Navigating to the
folder containing the jpgs and clicking on it, all the files in that folder show up in the panel on the right.
To highlight the jpgs I wanted, I held down the CTRL key while clicking each file. The files in that panel
can be shown in various ways, e.g. Thumbnails, a List, or Details. I usually prefer Details so I can see
the title, date created, etc. To change this view click on the small rectangular icon in about the middle
of the bar above the right panel. With the files highlighted, click Tools > Create Strip of Images
and you get the Strip menu with the selected files already listed on it. You can change the order of the
files in this menu by highlighting one and clicking the Move Up or Down arrow. Next, set the other options
in this menu. For example, the Alignment can be Horizontal (files side-by-side) or Vertical (files one over the other). For the horizontal option with the images side-by-side, you can also select whether you want
them aligned across the top or bottom or each one centered. They look good either way, but my examples
here will be aligning them across the bottom so they all sit at the same level. Uncheck the
Automatically Adjust Height or Width, since that would make each piece the same size and would change the
text size. For these jpgs I set the height to be 5 inches and the Spacing to be 25 pixels. The height
gives the height of the final image and you want it high enough so the whole jpg is shown. The spacing puts
a small gap between the images. By setting the spacing to 0 the two pieces are exactly side-by-side
with no gap. You can also select the background color and for this example I did both a white and a
black background, but you could select any other color, as well. Clicking Create forms the image and
you see a new tab labelled <Panorama> which shows the side-by-side image. By clicking on
the hierarchy icon (top left) you are back to your highlighted jpg files and can repeat the process with
different settings to generate a new side-by-side image. Each of these results remains and by clicking
on the tab you see each one so you can compare them and see which one you like best. To save one,
with it open, click File > Save As and tell it where to save it and what to name it.
These <Panorama> images remain until you close them or exit the program.
Here are the two
side-by-side images for this letter, the first with a white background and the second with a
black background.
SIDE-BY-SIDE IMAGE USING XNVIEW CLASSIC AND WHITE BACKGROUND
SIDE-BY-SIDE IMAGE USING XNVIEW CLASSIC AND BLACK BACKGROUND

CONCLUSIONS
XNVIEW CLASSIC seems to be a simple program to use to make side-by-side images and it's free for private or
educational use. The "supped up" XNVIEW MP may also have a similar feature, but I haven't investigated
it. In other Freeware Corner articles I'll write about using other programs to make side-by-side images.
===============================