DON'S FREEWARE CORNER - SEP 2019
USING GOOGLE SLIDES TO MAKE FAMILY HISTORY SLIDESHOWS
Don's Freeware Corner articles are printed in the UTAH VALLEY TECHNOLOGY AND GENEALOGY GROUP
(UVTAGG) Newsletter TAGGology each month and are posted on his Class Notes Page
https://uvtagg.org/classes/dons/dons-classes.html
where there may be corrections and updates.
USING GOOGLE SLIDES TO MAKE FAMILY HISTORY SLIDESHOWS
©2019 Donald R. Snow - Last updated 2019-10-04
PRESENTATION SOFTWARE
The most common presentation software program is Microsoft's Powerpoint
which is expensive and not easy to learn. There are many other
presentation programs and most have names that you have probably
never heard. These include Impress, Prezi, GOOGLE SLIDES, Visme,
Canva, Sway, and Zoho Show. Many of these are free or have free
versions and most have premium or commercial versions. Some
run on your own computer and others run in the cloud and require
an internet connection to do the presentation. Requiring an
internet connection for a presentation is sometimes risky, so
some people prefer software that allows saving a copy to show
without an internet connection. Some of the presentation software
programs make all your presentations available to everyone, so
they are completely public and visible and usable by anyone.
The commercial versions can be limited to just you or those you
specify. Some are compatible with Powerpoint and most
allow you to import Powerpoint presentations to edit and use,
but it changes them to a different format. Some allow you to save your
presentation in Powerpoint format, so it can be shown in Powerpoint
itself. Here are a few websites that review and give links to
such presentation software and there are many others.
https://www.improvepresentation.com/blog/powerpoint-alternatives-2018
https://officeninjas.com/5-free-powerpoint-alternatives/
https://www.listofuseful.com/free-powerpoint-alternatives/
https://graphicmama.com/blog/powerpoint-online-alternatives-software-outstanding-presentations/
https://www.customshow.com/best-powerpoint-alternatives-presentation-programs/
https://www.customshow.com/free-presentation-software-alternatives/
GOOGLE SLIDES
This Freeware Corner note will introduce GOOGLE SLIDES, a free program
that is fairly easy to use and with enough features to make it useful.
There are many YouTube tutorial videos about it and a good,
and short one (5-minutes), is https://www.youtube.com/watch?v=rFd8QRWm2FE .
The techie wife of one of my grandsons recently gave me a very helpful tutorial about it. To get to the program you
need to be logged into your GOOGLE account and those are free. If
you have a GOOGLE Gmail address, you already have a GOOGLE account.
If you don't have a Gmail address, you can get one free and then
you'll have a GOOGLE account. You don't need to use your Gmail
address, if you don't want to, but you need a GOOGLE account.
To get to the program when logged into your GOOGLE account click
on the "tic-tac-toe" icon (3x3 square) in the upper right of
your browser. This lists the many programs that are built into
GOOGLE and SLIDES is in that list. Click on it and you are in
GOOGLE SLIDES and ready to start making your presentation. If you want, you can drag the icon in front of the address bar onto your desktop and/or bookmark bar on the browser so you have an icon to click to go to GOOGLE SLIDES directly.
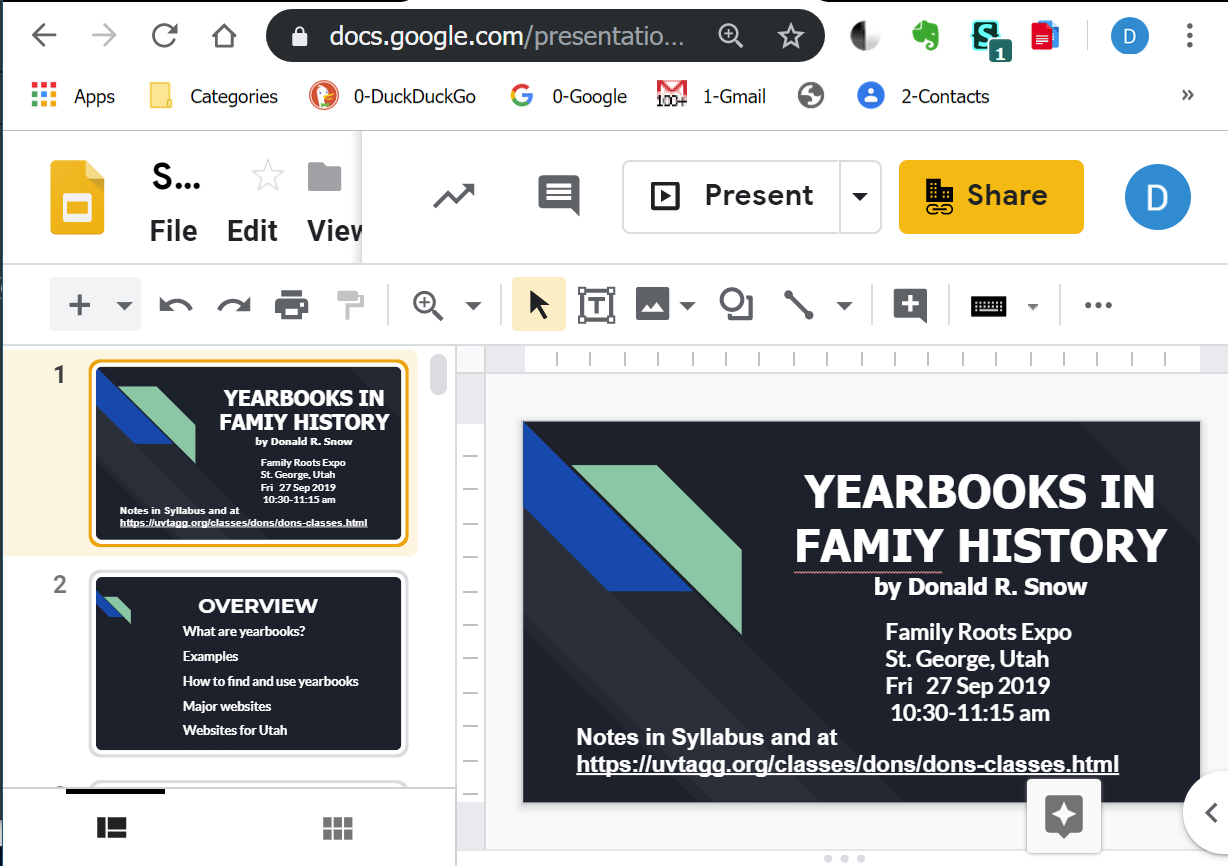
SCREENSHOT OF A GOOGLE SLIDES PRESENTATION
Included below is a screenshot while working on the slideshow I made in GOOGLE SLIDES
for a family history talk in St. George in Sep 2019. This shows what the program looks like in the Chrome browser.
MAKING A NEW PRESENTATION IN GOOGLE SLIDES
When you open GOOGLE SLIDES, if you were working on a presentation before,
it will open immediately to that slideshow for you to continue working on it. To start a new one, click
File in the upper left, then New > Presentation. On the right
you will see themes that you can select to use for a unified
appearance of each slide in your presentation. Scroll through
the collection to select the one you like for this presentation. As you make
your slideshow, keep in mind the intended audience. For example, as
we get older our eyesight isn't as good and we need larger
letters and higher contrast to see what's there. I've found
that a dark background and light letters helps for me.
Many younger people with good eyesight forget that
older folks may not be able to read their slides and they use
small letters, beautiful colors, and low contrast, some of it is illegible to me. I didn't realize this was a problem
until my eyesight got bad. (sigh) You can select the theme
before you start and can even change it after you've made
some or all the slides, if you decide to. For each of the themes there is a
series of layouts with that theme. These have titles and/or
text boxes in various locations and you can select any of these
for each slide. They all follow the same theme, but modify it for the way you want each slide.
When you start, you see the first slide in the middle of the screen
ready for you to enter text, pictures, links, etc., and a smaller
copy of it in the column on the left. As you add more slides,
the column on the left lists them all in order. To add
another slide, highlight the one just before where you want the new one, and click the + sign in the upper left. You can rearrange the slides by just clicking and
dragging a slide up or down in the list.
The name of your slideshow is in a box in the upper left and can be
renamed at any time. Until you rename it, it is called by the
first line of the title on the first slide. Also, you can say
where you want the slideshow to be stored. It is usually
helpful to save them in your GOOGLE MY DRIVE so you can get
to them and work on them or show them from any computer.
DRIVE (MY DRIVE) is a holding location in your GOOGLE account where you
can make and use folders to organize your files. To show your
presentation later from your MY DRIVE, you need an internet
connection and that's sometimes risky to depend on.
GOOGLE SLIDES allows you to save your presentation in several
formats, including .ppt (Powerpoint format) and .pdf. With
those formats you can show it without an internet connection,
if the computer has the right program or a comparable one.
More about presentations below.
MAKING SLIDES IN GOOGLE SLIDES
Depending on the theme you chose, there will be a text box to start typing on the slide. You can add a text box
wherever you want by clicking on the word Insert (near top
left) > Text Box and putting it where you want on the
slide. As you type, the text shows in whatever the
default font and size are. To see the font name and size
you may have to close the Themes box since that usually
covers the font names and sizes. Click on the text and
then the font name and size will appear above and to the right
of the slide. By highlighting the text you can change
the font, size, and color. When you are working on a slide,
to see more options for the text, click on the More icon
(three dots . . .) at the top right. This opens another row
of text icons for Bold, Italics, Underline, Align, etc.
I've found that Ariel Bold and Tahoma Bold are good fonts
to make the text clear. If you want to make a bulleted
or numbered list, there are options for them. If you make
a mistake and want to revert, click the curved "reverse"
arrow near the upper left. To redo something again, click
the curved "forward" arrow there.
To add an image to a slide click on the slide in the left column,
so it is in the working-slide position. Then click Insert >
Image or click on the icon that looks like a white mountain
on a black background, which is the same as the Insert > Image
button. You can upload an image from your computer or from the
web and various other places. Once on the slide you can expand
or contract it, move it around, add a text box for a caption, etc.
The slideshow is saved automatically at all times, so you don't need
to worry about losing it inadvertently. And, as mentioned above,
you can change the name and saving location at any time, as well.
There are many other things you can add to slides, but this
gives the basics.
PRESENTING THE SLIDESHOW
At any time, you can see how the slides will appear by clicking on
Present in the upper right corner. It will start showing the
presentation from the slide you were working on. You can start
from the beginning by clicking on the first slide before pressing
Present. Or, you can click on the pick arrow (the small
downward pointing triangle at the right end of the word Present),
and select the option of which slide to start from.
The presentation is shown in full-screen and has an information
bar at the bottom and a small information statement at the top.
You see these on your computer screen, but the audience won't
see them when this is projected with a VGA projector. I haven't tried this with an HDMI cable to a big-screen TV, so these information bars might show there. They are not obtrusive, but may cover up text or pictures that
you have near the bottom of a slide. To exit the presentation
mode, press ESC and you are back to the editing mode.
DOWNLOADING THE PRESENTATION
To be sure tyou have a copy of the presentation to show,
in case there is no internet connection where you plan
to show it, you can download it in several formats,
including pptx (Powerpoint format), pdf (Portable Document
Format), and odp (Open Document Presentation format).
The pptx format requires a Powerpoint or compatible
program to show. The odp format can be shown using the
free presentation program Impress in LibreOffice. LibreOffice is compatible with all the
Microsoft Office programs. The pdf format
puts each of the slides one after the other in a long
vertical file which can be shown with any pdf viewer.
Using this format you click Page Down to show the next slide. In this
format there are no animations, of course. GOOGLE SLIDES
does have some animation and slide transition properties
and those haven't been discussed at all in this Freeware Corner article.
CONCLUSIONS
GOOGLE SLIDES is a free and easy to use presentation program.
If you have never made a slideshow presentation, this may
be a great place to start, since it is so much easier
to use, and less costly (free!), than Powerpoint. There are
many places in family history where slideshows are useful
including classes, family reunions, shows for children
in family home evenings, explaining your genealogy research
results, and on and on. They are like writing articles
or books and may be a good way to pass along family stories
and information to your descendants. GOOGLE SLIDES will
do much more than we have discussed here, so I will
write additional Freeware Corner articles about it.
=================================